Lazy girl meal prep lunches

img_20170305_213651

The concept of spending ridiculous amounts of time pre-preparing meals has always been unappealing to me, made worse by the fact that I don’t think I do it right because by Wednesday I’m always stuck eating sad, soggy veggies that I have to power through for two more days. So when I started seriously tracking what I eat and trying to save money by packing lunch, I came up with this lazy “bowl” type of meal that is semi prepped in advance, but still somewhat flexible.

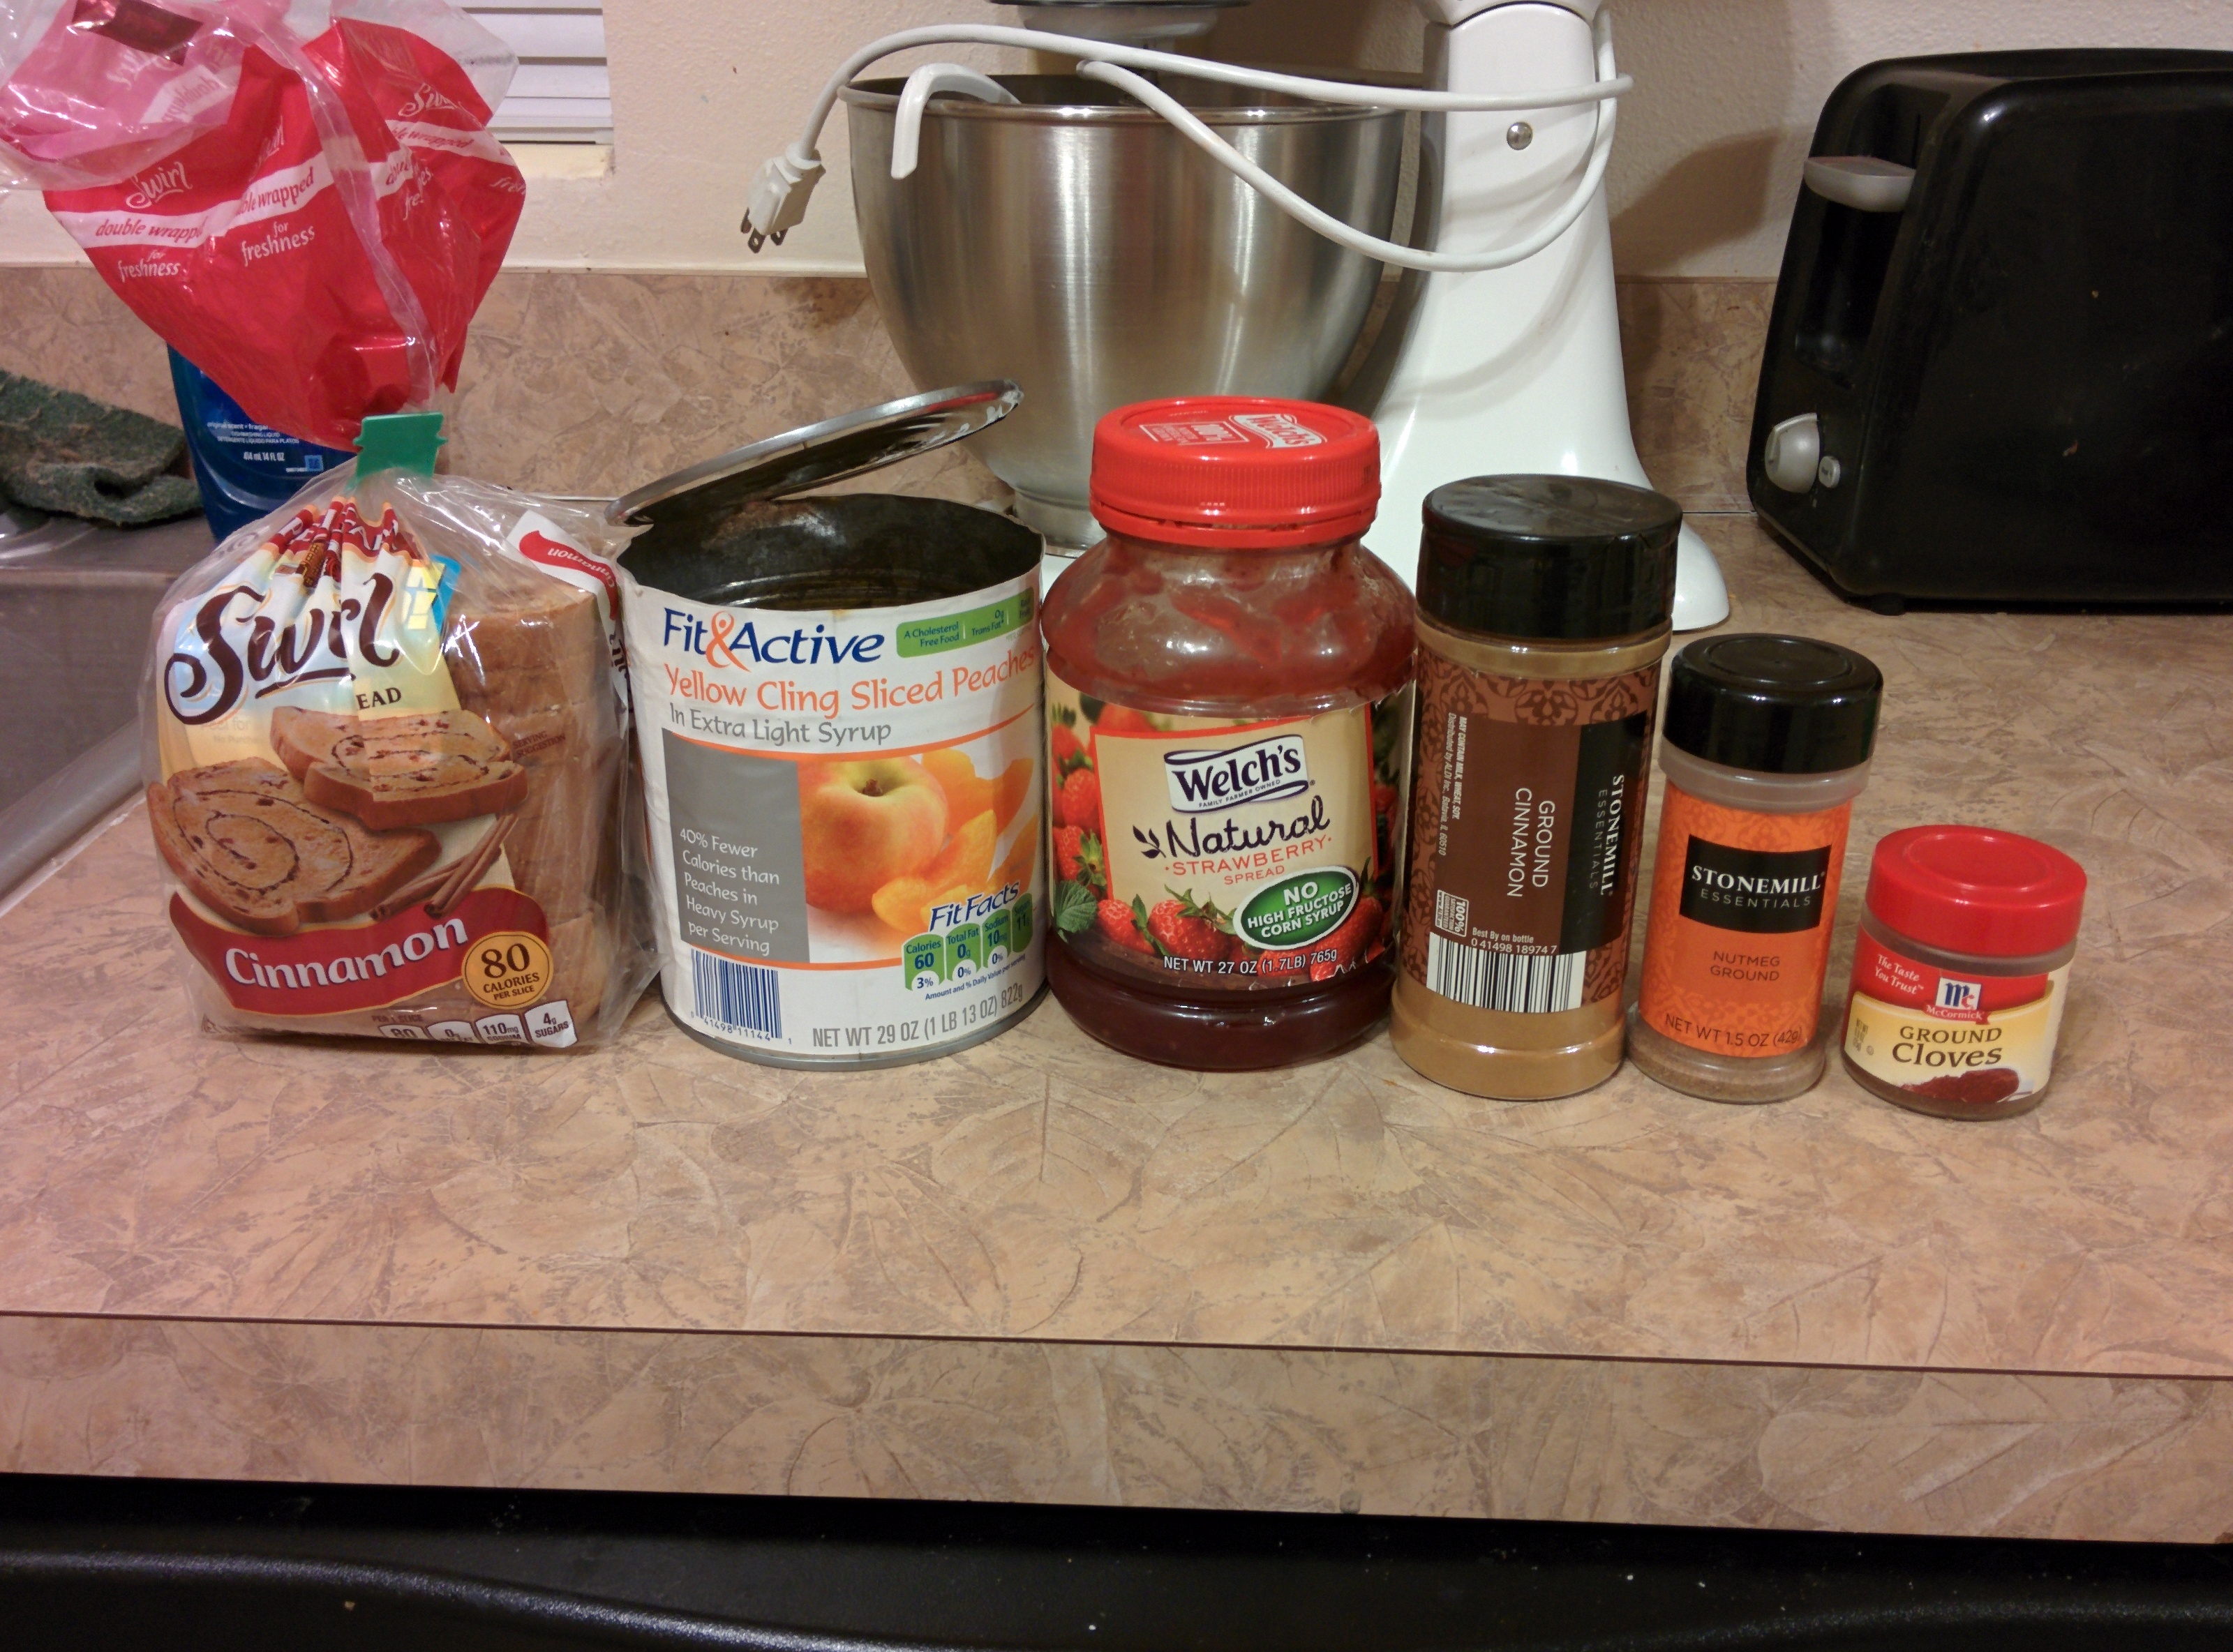
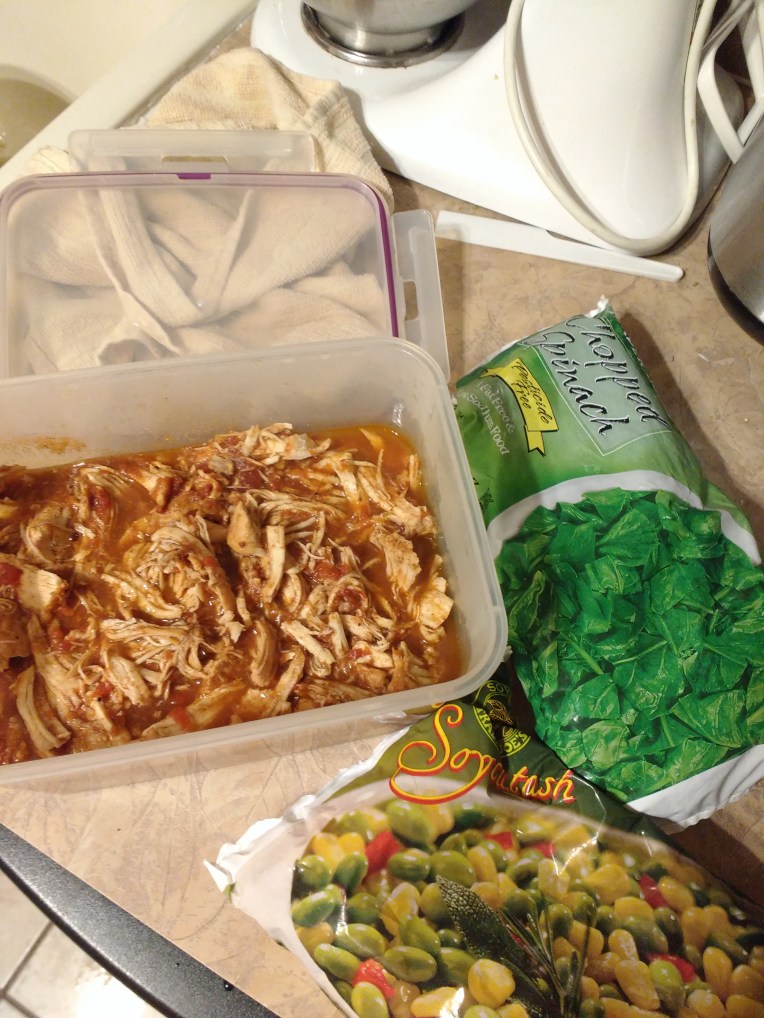
I cook a bulk amount of chicken breast in the crock pot/instant pot with some sort of seasoning or broth (I got real fancy this week with leftover canned tomatoes and Moroccan spices, but it’s usually water and a couple shakes of whatever seasoning blend I see first). Then every morning I measure 4-6 oz of chicken (depending on how much protein I think I’ll need), 1 cup of frozen spinach and 1/2 cup of some sort of beans or starchy veggie (soy succotash from TJ pictured). Sometimes an additional vegetable, sometimes more spinach. It’s quick enough to assemble every morning but also allows for some more flexibility. Sometimes I put BBQ sauce on it, but lately I’ve been packing it plain and adding hot sauce at work to save calories (although TJ Sriracha garlic BBQ sauce is like 50 calories and delicious).

I haven’t gotten sick of it yet and it’s pretty filling and a lot more satisfying and nutritious than the sad, dry salads I used to pack. One day I’ll experiment with different proteins and sauces, but I kind of crave the chicken when lunch time rolls around. Plus, I’ve mixed up my vegetables enough that each week they’re a little different (I used butternut squash in the fall and it’s always a treat to mix in chick peas as my beans)!

I don’t prep dinner ever, that’s a meal that my husband and I like to enjoy together and he likes variety and fun things (hello, homemade pizza)! But eating these bowls for lunch leaves my eating plan for the rest of the day pretty open to whatever we’re craving for dinner because this one lunch is pretty high in fiber and protein, but low in fat and carbs.

One day I’ll incorporate roasted brussel sprouts into the mix (my all time, hands down favorite vegetable and probably one of my favorite foods in general), but the pre cooked chicken and frozen vegetables has been a life saver for the past 5 months (20 lbs down, body composition changes, etc).

Peanut Butter Energy Bites – Modified

wpid-img_20150104_214840_1.jpg

I’ve been making delicious no-bake energy bites for a while and I love them so much that tonight when I MEANT to make peanut butter protein balls, I ended up just making a slightly less caloric version of these delicious bites. Fine by me!

It’s not many fewer calories per bite, about 30 less, but if you “accidentally” eat four (or six or eight…) instead of one, it adds up (or subtracts up?).

I’m hyper-focused on eating better and working out more right now, which has been very beneficial since I started in early November. I avoided weight gain over the holidays (!!!!), can feel myself getting stronger and just overall feel a little better (when I’m not exhausted from spin class).

This also means that I can be a little obsessed (annoying) with my calories/nutrients. My tried and true method for keeping my weight in check is to count what I eat. I’ve been doing it for 16 years. I’m eternally grateful to my mother for encouraging me to start counting “points” when I was 12 and giving me the baseline knowledge about food and health that I have been using ever since. I’ve also matured from the days when I would ration my calories to eat a McFlurry after dinner (calorie math according to a seventh grader) and now try to get the right balance of nutrients in addition to sticking to a specific calorie range.

WHICH MEANS these bites are the perfect treat for my birthday week! Don’t get me wrong, I fully indulged over the holidays (hello, homemade ziti, cinnamon rolls, cookies, etc) and plan on eating REAL cake and brunch and BBQ on my birthday this weekend (I hope my husband reads this), I just don’t want to do that all week….

Not that these bites are much of a compromise. They are delicious and their texture is out of this world. omnomnomonomonom

Ingredients

  • 1 cup oats
  • 1/4 cup ground flax-seed
  • 1/4 cup lite agave nectar
  • 5 tbsps peanut butter
  • 1 scoop of protein powder (I used cookies n cream flavored whey protein because I got a huge 5lb barrel of it on sale, which side note, made me feel like a total badass (cough, poser, cough) carrying around Costco)
  • 1/4 cup coconut flakes – I only had sweetened, but unsweetened would probably be better!
  • 1/4 cup chocolate chips, slightly chopped up so they go further
  • 1-2 tbsp water as needed

Directions:

  • Add all ingredients except water in a large mixing bowl
  • Add water before forming into balls. The mixture will be a little dry since it’s modified and you will need extra moisture to bind them.
  • Use a measuring table-spoon to section out the bites and form into balls. Recipe makes about 22 bites.
  • Refrigerate!

Nutrition info per bite:

  • Calories: 80
  • Fat: 4
  • Cholesterol: 4
  • Sodium: 32
  • Carbs: 9
  • Fiber: 1.5
  • Protein: 3

Coconut Ginger Peanut Chicken

This dish… where do I begin. I’ve made variations of this for almost four years. It started with a sauce recipe from a good friend, but has sort of evolved over time as I substitute ingredients and add new flavors I think would go well with it. I made it tonight and it has turned into something new and I needed to document my creation so it can be duplicated. For the first time I used coconut oil, which really added to the flavor and helped keep the sauce from soaking into the noodles and drying up. 

Coconut Ginger Peanut Chicken Ingredients
Somebody please remind me to take photos of my food so I’m not stuck with ingredient shots!

The very nature of this dish is that it’s not an exact science. The measurements for the sauce are estimates and can be adjusted according to taste. The trick is to add enough (maybe even too much) peanut butter to get that strong peanut flavor, while thinning it out with coconut oil and water so you have enough sauce to cover your noodles. Be careful with the soy sauce, as I’ve made it wayyy too salty before and that’s never fun. This dish goes well with lo mein noodles, spaghetti noodles and even the cheap ramen (minus the prepackaged seasoning)!

Serves 4-6 

Main Dish Ingredients:

  • 2 chicken breasts, cut into thin slices
  • 3 tbsp coconut oil (this sounds like a lot, but it becomes part of the sauce too)
  • 1 tsp curry mix
  • dash of salt
  • Mixed veggies 
  • Spaghetti or other long noodle

Sauce

  • 1 tbsp soy sauce
  • 2 tbsp teriyaki suace
  • 1/3 cup Tonton Ginger dressing and marinade 
  • 1/2 cup peanut butter
  • 2 tbsp sugar or sweetener (like stevia)
  • 1 cup water
  • 1/2 tsp sesame oil
  • 1 tbsp lemon juice
  • A couple dashes of ginger powder
  1. Heat coconut oil on medium heat in your pan and start to make the noodles according to package.
  2. Slice the chicken into thin, sort of long pieces. Sprinkle curry and salt on it and cook in the coconut oil. You can add a small amount of peanut butter to the chicken as it cooks.
  3. Once chicken is fully cooked, turn the heat down to low-medium and add ingredients for the sauce over the chicken in the same pan. I add peanut butter about a third at a time so it can melt and mix in more easily. 
  4. If mixture is too watery, let it simmer for about 10 minutes to reduce.
  5. Add frozen veggies as you’re mixing in the sauce and cover for several minutes to cook all the way through. Don’t let the veggies cook too long or they can wilt and get mushy. I used California blend because the broccoli and cauliflower really soak up the sauce. I’ve made it with fresh veggies too, the frozen ones are just quicker!
  6. Serve over noodles and go back for seconds! 

Cinnamon Buttercream Icing/Frosting…Friceting

image

I created this recipe from combination of recipes I’ve used before and some I was looking at right before making it. It’s really easy and I made it to put on cinnamon roll bread pudding – so dangerous! It’s a frosting icing hybrid because I used less butter than most butter creams and more milk. 

Ingredients:

  • 3 cups confectioner’s sugar
  • 6 tbsp butter (almost an entire stick)
  • 1/4 cup – or more depending
  • 1 tsp vanilla extract
  • 1/2 tbsp or more cinnamon


Directions:

Combine ingredients in a bowl and whip it up with a mixer on high speed. That’s it! I will be posting my version of the cinnamon roll bread pudding if it turns out good!

Homemade Biscuits, Ya’ll (recipe review)

Homemade Biscuits

I wanted some sort of bread with my pot roast the other night and I was about to make canned biscuits when I thought, “I have a blog now I can’t just make canned biscuits!” I found this recipe a while ago for J.P.’s Big Daddy Biscuits and it seemed simple enough. It was! Several reviewers of this recipe used butter instead of shortening so I decided to try that too, because butter.

It was easy enough to make. I always have trouble cutting butter into flour, but I found I made the most progress by pre-slicing the butter and then using one knife while tilting the bowl and using it as sort of a cutting surface. Then came the fun part, cutting out the biscuits! messy aftermath of biscuit cutting I don’t have a circular cookie cutter so I used a little juice glass and it worked perfectly. Once you cut out a couple of biscuits, you have to roll the dough out again. This part got a little tricky and sticky, so just make sure you use a lot of flour on everything, including your kneading surface, hands, cutter, etc. It made an awesome, fun mess!

It was really fun cutting them out, I felt like a biscuit girl at Bojangles (that’s normal to get excited about, right?)!! I made seven biscuits with this recipes. And we definitely broke out the jam to carry these babies into dessert time.


Easy Peach Melba on Cinnamon Toast

As you may notice with several of my recipes, I like to modify existing ones to fit my needs. The same applies for the amazing, dangerously easy dessert I made last night. I tasted the original recipe for Peach Melba Cinna-bun at Publix, in their Apron cooking samples section. It was incredibly delicious, but called for things that felt a little extravagant. As much as I wanted to spend extra money on raspberry sauce, frozen peaches and (AMAZING) cinnamon buns, I felt like I should forego the extra charges. Also, I don’t need cinnamon buns lying around my house begging to be eaten.

So I got home and made dinner as usual, only briefly noticing the canned peaches in my pantry until they popped into my mind as my husband and I watched TV. I thought that with leftover cinnamon bread from Easter, I might have enough ingredients in my house to make something similar, and I did!!!

This was such a quick and easy thing to make, I didn’t have time to even take a picture of it, so I took a picture of the ingredients to show how simple it is to throw together.

wpid-wp-1398824935577.jpeg

Ingredients:

  • Two pieces of bread for toasting (cinnamon or raisin bread)
  • 1 cup sliced peaches (preferably fresh, but canned or frozen work)
  • About 2 tbs strawberry or raspberry jam
  • Cinnamon, clove, nutmeg
  • Whipped cream (not pictured because my husband makes it from scratch and it’s too good not to use up)


Directions:

  1. Toast bread
  2. In a small sauce pan, add peaches and jam and stir on low heat until they are mixed and create a syrup
  3. Add cinnamon, nutmeg and clove to taste (about two dashes of cinnamon, a dash of nutmeg and a half dash of clove)
  4. Serve over the toast, making use of all of the sauce/syrup you just created
  5. Add whipped cream


That’s it!

Bed and Breakfast Scones

Bed and Breakfast Scones

My husband and I stayed at the best bed and breakfast for one night on our honeymoon, on our way up to the Smoky mountains. One of the things they served for breakfast were chocolate chip scones, which we thought were one of the most delicious things we’d ever tried. The Inn actually has their own blog full of all kinds of delicious recipes, but I haven’t seen their chocolate chip scone recipe yet (if you find it please tell me!!!), so I was left to rely on the Internet for the second best thing. I’ve made these so often they are practically the dessert mascot for our marriage. I found the following recipe here and here and sort of combined the two techniques for shaping the scones.  I believe it’s originally a Hershey’s recipe. I’ve copied it below, with the technique I use for getting wedge-shaped scones.


Ingredients:
  • 1½ cups plus 2 tbsp. all-purpose flour
  • ¼ cup sugar
  • 2 tsp. baking powder
  • Pinch of salt
  •  1 cup chocolate chips
  • 1 cup heavy cream
  • 2 tbsp. butter, melted
  • Additional sugar for sprinkling (optional)
Directions:
  1. Preheat the oven to 375˚ F.
  2. Line a baking sheet with parchment paper or a silicone baking mat.
  3. Combine the flour, sugar, baking powder and salt in a medium bowl; stir to combine.
  4. Toss in the chocolate chips and stir to blend.
  5. Add the heavy cream to the flour mixture, stirring just until a dough forms and the dry ingredients are incorporated.
  6. Knead the dough very briefly with well floured hands to ensure even mixing.
  7. Take dough ball and place on baking sheet. Flatten it out into a circle and slice into 6-8 triangle wedges, separating wedges from one another so they bake as individual pieces.
  8. Melt butter and brush onto each piece and then sprinkle extra sugar on top.
  9.  Bake 20-25 minutes, until lightly browned (original recipe says 15-20, but with my oven it always needs  a little extra time).


I’m making perfect potato soup tonight with these for dessert. It’s the newlywed special since I made this so often in the first few months of our marriage. I can’t believe it’s almost been a year!

Perfect Potato and Leek Soup

This soup is so so good. It doesn’t photograph well, so I chose an image that represents how I feel about it instead. I first made this when my husband had his wisdom teeth taken out (2 days after we got back from our honeymoon!). I modified and mixed a few recipes I found on the internet and I’ve been meaning to document it because the only record I have of this deliciousness is a crumpled page of a magnetic note pad/my memory. This soup is NOT low-calorie. I specifically changed it to provide nutrition for my husband who couldn’t chew, but that’s also what makes it so good. A few ingredients can be substituted for healthier alternatives, however. This soup is not rocket science, things can be changed and added and it still pretty much tastes amazing. In fact, with how many times I’ve made this in the past 5 months, I’ve subbed vegetable broth for chicken broth, added too few/many leeks/potatoes, and have been completely off by the amount of broth needed and it’s still awesome each time. There’s something about the creamy mixture of potatoes and leeks.

Ingredients:

  • 2 strips of bacon
  • 1/2 cup butter (one stick)
  • 1 medium sized onion (it doesn’t really matter what kind)
  • 3 leeks (or two giant leeks or 4 small leeks)
  • 3 large potatoes
  • 2 cans (14.5oz) of chicken broth (about 3 cups?)
  • 1 1/2  cups milk (or cream if you really want to be bad)
  • 1 tsp salt
  • 1/4 tsp pepper
  • cheddar cheese (optional)

Directions!

  1. In a large sauce pan (I use a ceramic dutch oven) cook the bacon on medium heat until it’s really crispy. It should be crispier than normal bacon that you’d eat for breakfast. Take it out and let it cool off for a bit and then chop it up in to tiny bacon-bit pieces.
  2. Turn the temperature down to low and melt butter in the bacon fat (you can use less butter if you want), and toss the bacon bits back in.
  3. Chop up the onion and leeks and stir into pot. Cover and cook for 20 minutes
  4. Chop up potatoes and stir in. Cover and cook for 15 minutes.
  5. Stir in broth, milk, salt, and pepper and bring to a boil.
  6. Reduce heat and simmer until potatoes are tender (soft enough to be cut with a fork).
  7. Remove from heat to cool slightly.
  8. Lightly blend the soup so the potatoes get mushed up a little bit and thicken the sauce (you still want chunks). This is not a pureed soup so don’t blend too much! I use my kitchen-aid stand mixer with the ceramic triangle attachment – for about 30 seconds on a slow speed – a blender or food processor can work too.
  9. Return to heat for a few minutes just to warm it back up.
  10. Serve in bowls with cheese on top. This recipe serves 4-5.